[vc_row dfd_row_responsive_enable=”dfd-row-responsive-enable” css=”.vc_custom_1572939761097{padding-right: 5% !important;padding-left: 5% !important;background-image: url(https://trekkinghq.com/wp-content/uploads/2019/01/Shira-Hut-1.jpg?id=796) !important;}” responsive_styles=”padding_left_desktop:10|padding_right_desktop:10″][vc_column][dfd_spacer screen_wide_resolution=”1280″ screen_wide_spacer_size=”200″ screen_normal_resolution=”1024″ screen_tablet_resolution=”800″ screen_mobile_resolution=”480″ screen_normal_spacer_size=”100″ screen_tablet_spacer_size=”50″ screen_mobile_spacer_size=”50″][dfd_heading delimiter_style=”image” style=”style_05″ title_font_options=”tag:h5|font_size:50|color:%23ffffff” subtitle_font_options=”tag:h3|font_size:17|color:%23ffffff” subtitle=”
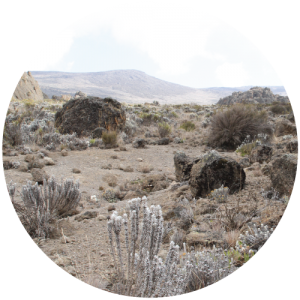
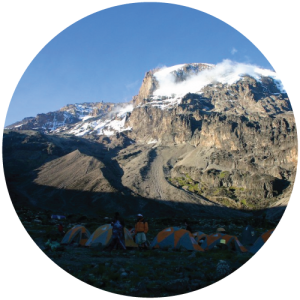
One of the more beautiful routes, Shira is considered one of the older Mt Kilimanjaro routes, approaching from the west, this route is seen as quite challenging as the trek commences at a very high altitude of …, not allowing trekking to acclimatise well so many trekkers now opt for Lemosho Route. We recommend this route for the experienced or pre-acclimatised trekkers following on from Mt Meru.” delimiter_image=”1045″]
SHIRA ROUTE
[/dfd_heading][dfd_spacer screen_wide_resolution=”1280″ screen_wide_spacer_size=”200″ screen_normal_resolution=”1024″ screen_tablet_resolution=”800″ screen_mobile_resolution=”480″ screen_normal_spacer_size=”100″ screen_tablet_spacer_size=”50″ screen_mobile_spacer_size=”50″][dfd_spacer screen_wide_resolution=”1280″ screen_wide_spacer_size=”100″ screen_normal_resolution=”1024″ screen_tablet_resolution=”800″ screen_mobile_resolution=”480″ screen_normal_spacer_size=”50″ screen_tablet_spacer_size=”25″ screen_mobile_spacer_size=”25″][/vc_column][/vc_row][vc_row][vc_column][dfd_spacer screen_wide_resolution=”1280″ screen_wide_spacer_size=”100″ screen_normal_resolution=”1024″ screen_tablet_resolution=”800″ screen_mobile_resolution=”480″ screen_normal_spacer_size=”50″ screen_tablet_spacer_size=”25″ screen_mobile_spacer_size=”25″][vc_row_inner][vc_column_inner width=”1/6″][dfd_info_box hover_animation=”hover-up-icon” read_more=”box” icon_type=”custom” icon_image_id=”554″ style=”style-01″ layout=”layout-01″ title=”Northern Route” icon_size=”150″ title_font_options=”tag:div” subtitle_font_options=”tag:div” font_options=”tag:div” icon_bg_size=”145″ border_radius=”2″ fill_color_start=”#e24d4d” fill_color_end=”#939393″ subtitle=”remote and long Mt Kilimanjaro hiking” link=”url:https%3A%2F%2Ftrekkinghq.com%2Fnorthern-route%2F|||”][/dfd_info_box][/vc_column_inner][vc_column_inner width=”1/6″][dfd_info_box hover_animation=”hover-up-icon” read_more=”box” icon_type=”custom” icon_image_id=”762″ style=”style-01″ layout=”layout-01″ title=”Marangu Route” icon_size=”150″ title_font_options=”tag:div” subtitle_font_options=”tag:div” font_options=”tag:div” icon_bg_size=”145″ border_radius=”2″ fill_color_start=”#e24d4d” fill_color_end=”#939393″ subtitle=”The most popular route” link=”url:https%3A%2F%2Ftrekkinghq.com%2Fmarangu-route%2F|||”][/dfd_info_box][/vc_column_inner][vc_column_inner width=”1/6″][dfd_info_box hover_animation=”hover-up-icon” read_more=”box” icon_type=”custom” icon_image_id=”760″ style=”style-01″ layout=”layout-01″ title=”Machame Route” icon_size=”150″ title_font_options=”tag:div” subtitle_font_options=”tag:div” font_options=”tag:div” icon_bg_size=”145″ border_radius=”2″ fill_color_start=”#e24d4d” fill_color_end=”#939393″ subtitle=”The Second Most Popular” link=”url:https%3A%2F%2Ftrekkinghq.com%2Fmachame-route%2F|||”][/dfd_info_box][/vc_column_inner][vc_column_inner width=”1/6″][dfd_info_box hover_animation=”hover-up-icon” read_more=”box” icon_type=”custom” icon_image_id=”761″ style=”style-01″ layout=”layout-01″ title=”Lemosho Route” icon_size=”150″ title_font_options=”tag:div” subtitle_font_options=”tag:div” font_options=”tag:div” icon_bg_size=”145″ border_radius=”2″ fill_color_start=”#e24d4d” fill_color_end=”#939393″ subtitle=”Retains a sense of untouched wilderness ” link=”url:https%3A%2F%2Ftrekkinghq.com%2Flemosho-route%2F|||”][/dfd_info_box][/vc_column_inner][vc_column_inner width=”1/6″][dfd_info_box hover_animation=”hover-up-icon” read_more=”box” icon_type=”custom” icon_image_id=”763″ style=”style-01″ layout=”layout-01″ title=”Rongai Route” icon_size=”150″ title_font_options=”tag:div” subtitle_font_options=”tag:div” font_options=”tag:div” icon_bg_size=”145″ border_radius=”2″ fill_color_start=”#e24d4d” fill_color_end=”#939393″ subtitle=”good test of your climbing skills” link=”url:https%3A%2F%2Ftrekkinghq.com%2Frongai-route%2F|||”][/dfd_info_box][/vc_column_inner][vc_column_inner width=”1/6″][dfd_info_box hover_animation=”hover-up-icon” read_more=”box” icon_type=”custom” icon_image_id=”765″ style=”style-01″ layout=”layout-01″ title=”Umbwe Route” icon_size=”150″ title_font_options=”tag:div” subtitle_font_options=”tag:div” font_options=”tag:div” icon_bg_size=”145″ border_radius=”2″ fill_color_start=”#e24d4d” fill_color_end=”#939393″ subtitle=”comfortable and unforgettable.” link=”url:https%3A%2F%2Ftrekkinghq.com%2Fumbwe-route%2F|||”][/dfd_info_box][/vc_column_inner][/vc_row_inner][vc_row_inner][vc_column_inner width=”1/4″][/vc_column_inner][vc_column_inner width=”1/2″][dfd_delimiter delimiter_style=”dfd-delimiter-with-icon” icon_size=”50″ delimiter_border_style=”dotted” icon_font=”entypo” icon_entypo=”entypo-icon entypo-icon-flag” show_icon=”enable_icon”][/vc_column_inner][vc_column_inner width=”1/4″][/vc_column_inner][/vc_row_inner][dfd_spacer screen_wide_resolution=”1280″ screen_wide_spacer_size=”100″ screen_normal_resolution=”1024″ screen_tablet_resolution=”800″ screen_mobile_resolution=”480″ screen_normal_spacer_size=”50″ screen_tablet_spacer_size=”25″ screen_mobile_spacer_size=”25″][/vc_column][/vc_row][vc_row dfd_row_config=”full_width_content” dfd_row_responsive_enable=”dfd-row-responsive-enable” css=”.vc_custom_1548233522985{padding-right: 100px !important;padding-left: 100px !important;background-color: #efefef !important;}” responsive_styles=”padding_left_desktop:300|padding_right_desktop:300″][vc_column width=”1/3″][vc_single_image image=”797″ img_size=”full”][dfd_spacer screen_wide_resolution=”1280″ screen_wide_spacer_size=”15″ screen_normal_resolution=”1024″ screen_tablet_resolution=”800″ screen_mobile_resolution=”480″ screen_normal_spacer_size=”10″ screen_tablet_spacer_size=”5″ screen_mobile_spacer_size=”5″][dfd_spacer screen_wide_resolution=”1280″ screen_wide_spacer_size=”15″ screen_normal_resolution=”1024″ screen_tablet_resolution=”800″ screen_mobile_resolution=”480″ screen_normal_spacer_size=”10″ screen_tablet_spacer_size=”5″ screen_mobile_spacer_size=”5″][vc_column_text]MT KILIMANJARO SHIRA ROUTE 6 DAYS[/vc_column_text][dfd_spacer screen_wide_resolution=”1280″ screen_wide_spacer_size=”15″ screen_normal_resolution=”1024″ screen_tablet_resolution=”800″ screen_mobile_resolution=”480″ screen_normal_spacer_size=”10″ screen_tablet_spacer_size=”5″ screen_mobile_spacer_size=”5″][dfd_spacer screen_wide_resolution=”1280″ screen_wide_spacer_size=”15″ screen_normal_resolution=”1024″ screen_tablet_resolution=”800″ screen_mobile_resolution=”480″ screen_normal_spacer_size=”10″ screen_tablet_spacer_size=”5″ screen_mobile_spacer_size=”5″][dfd_delimiter delimiter_style=”dfd-delimiter-with-line” delimiter_border_style=”dotted” module_animation=”transition.whirlIn”][dfd_spacer screen_wide_resolution=”1280″ screen_wide_spacer_size=”15″ screen_normal_resolution=”1024″ screen_tablet_resolution=”800″ screen_mobile_resolution=”480″ screen_normal_spacer_size=”10″ screen_tablet_spacer_size=”5″ screen_mobile_spacer_size=”5″][dfd_icon_list main_style=”style-1″][dfd_icon_list_item icon_type=”custom” icon_img=”916″]Distance: 67 Kms[/dfd_icon_list_item][dfd_icon_list_item icon=”dfd-icon-calendar”]Days: 6 Days[/dfd_icon_list_item][dfd_icon_list_item icon_type=”custom” icon_img=”921″]Summit Accent Route: Barafu / Western Breach[/dfd_icon_list_item][dfd_icon_list_item icon_type=”custom” icon_img=”923″]Descent Route: Mweka Route[/dfd_icon_list_item][dfd_icon_list_item icon_type=”custom” icon_img=”995″]Accommodation: Camping[/dfd_icon_list_item][dfd_icon_list_item icon_type=”custom” icon_img=”914″]Experience Required: Advanced[/dfd_icon_list_item][dfd_icon_list_item icon=”dfd-icon-heavy_snow”]Acclimatisation: Poor[/dfd_icon_list_item][dfd_icon_list_item icon=”dfd-icon-flag”]Summit Success: Low[/dfd_icon_list_item][/dfd_icon_list][/vc_column][vc_column width=”1/3″][vc_single_image image=”798″ img_size=”full”][dfd_spacer screen_wide_resolution=”1280″ screen_wide_spacer_size=”15″ screen_normal_resolution=”1024″ screen_tablet_resolution=”800″ screen_mobile_resolution=”480″ screen_normal_spacer_size=”10″ screen_tablet_spacer_size=”5″ screen_mobile_spacer_size=”5″][dfd_spacer screen_wide_resolution=”1280″ screen_wide_spacer_size=”15″ screen_normal_resolution=”1024″ screen_tablet_resolution=”800″ screen_mobile_resolution=”480″ screen_normal_spacer_size=”10″ screen_tablet_spacer_size=”5″ screen_mobile_spacer_size=”5″][vc_column_text]MT KILIMANJARO SHIRA ROUTE 7 DAYS[/vc_column_text][dfd_spacer screen_wide_resolution=”1280″ screen_wide_spacer_size=”15″ screen_normal_resolution=”1024″ screen_tablet_resolution=”800″ screen_mobile_resolution=”480″ screen_normal_spacer_size=”10″ screen_tablet_spacer_size=”5″ screen_mobile_spacer_size=”5″][dfd_spacer screen_wide_resolution=”1280″ screen_wide_spacer_size=”15″ screen_normal_resolution=”1024″ screen_tablet_resolution=”800″ screen_mobile_resolution=”480″ screen_normal_spacer_size=”10″ screen_tablet_spacer_size=”5″ screen_mobile_spacer_size=”5″][dfd_delimiter delimiter_style=”dfd-delimiter-with-line” delimiter_border_style=”dotted” module_animation=”transition.whirlIn”][dfd_spacer screen_wide_resolution=”1280″ screen_wide_spacer_size=”15″ screen_normal_resolution=”1024″ screen_tablet_resolution=”800″ screen_mobile_resolution=”480″ screen_normal_spacer_size=”10″ screen_tablet_spacer_size=”5″ screen_mobile_spacer_size=”5″][dfd_icon_list main_style=”style-1″][dfd_icon_list_item icon_type=”custom” icon_img=”916″]Distance: 67 Kms[/dfd_icon_list_item][dfd_icon_list_item icon=”dfd-icon-calendar”]Days: 7 Days[/dfd_icon_list_item][dfd_icon_list_item icon_type=”custom” icon_img=”921″]Summit Accent Route: Barafu / Western Breach[/dfd_icon_list_item][dfd_icon_list_item icon_type=”custom” icon_img=”923″]Descent Route: Mweka Route[/dfd_icon_list_item][dfd_icon_list_item icon_type=”custom” icon_img=”995″]Accommodation: Camping[/dfd_icon_list_item][dfd_icon_list_item icon_type=”custom” icon_img=”914″]Experience Required: Intermediate[/dfd_icon_list_item][dfd_icon_list_item icon=”dfd-icon-heavy_snow”]Acclimatisation: Poor to Average[/dfd_icon_list_item][dfd_icon_list_item icon=”dfd-icon-flag”]Summit Success: Average[/dfd_icon_list_item][/dfd_icon_list][dfd_spacer screen_wide_resolution=”1280″ screen_wide_spacer_size=”15″ screen_normal_resolution=”1024″ screen_tablet_resolution=”800″ screen_mobile_resolution=”480″ screen_normal_spacer_size=”10″ screen_tablet_spacer_size=”5″ screen_mobile_spacer_size=”5″][/vc_column][vc_column width=”1/3″][vc_single_image image=”799″ img_size=”full”][dfd_spacer screen_wide_resolution=”1280″ screen_wide_spacer_size=”15″ screen_normal_resolution=”1024″ screen_tablet_resolution=”800″ screen_mobile_resolution=”480″ screen_normal_spacer_size=”10″ screen_tablet_spacer_size=”5″ screen_mobile_spacer_size=”5″][dfd_spacer screen_wide_resolution=”1280″ screen_wide_spacer_size=”15″ screen_normal_resolution=”1024″ screen_tablet_resolution=”800″ screen_mobile_resolution=”480″ screen_normal_spacer_size=”10″ screen_tablet_spacer_size=”5″ screen_mobile_spacer_size=”5″][vc_column_text]MT KILIMANJARO SHIRA ROUTE 8 DAYS[/vc_column_text][dfd_spacer screen_wide_resolution=”1280″ screen_wide_spacer_size=”15″ screen_normal_resolution=”1024″ screen_tablet_resolution=”800″ screen_mobile_resolution=”480″ screen_normal_spacer_size=”10″ screen_tablet_spacer_size=”5″ screen_mobile_spacer_size=”5″][dfd_spacer screen_wide_resolution=”1280″ screen_wide_spacer_size=”15″ screen_normal_resolution=”1024″ screen_tablet_resolution=”800″ screen_mobile_resolution=”480″ screen_normal_spacer_size=”10″ screen_tablet_spacer_size=”5″ screen_mobile_spacer_size=”5″][dfd_delimiter delimiter_style=”dfd-delimiter-with-line” delimiter_border_style=”dotted” module_animation=”transition.whirlIn”][dfd_spacer screen_wide_resolution=”1280″ screen_wide_spacer_size=”15″ screen_normal_resolution=”1024″ screen_tablet_resolution=”800″ screen_mobile_resolution=”480″ screen_normal_spacer_size=”10″ screen_tablet_spacer_size=”5″ screen_mobile_spacer_size=”5″][dfd_icon_list main_style=”style-1″][dfd_icon_list_item icon_type=”custom” icon_img=”916″]Distance: 67 Kms[/dfd_icon_list_item][dfd_icon_list_item icon=”dfd-icon-calendar”]Days: 8 Days[/dfd_icon_list_item][dfd_icon_list_item icon_type=”custom” icon_img=”921″]Summit Accent Route: Barafu / Western Breach[/dfd_icon_list_item][dfd_icon_list_item icon_type=”custom” icon_img=”923″]Descent Route: Mweka Route[/dfd_icon_list_item][dfd_icon_list_item icon_type=”custom” icon_img=”995″]Accommodation: Camping[/dfd_icon_list_item][dfd_icon_list_item icon_type=”custom” icon_img=”914″]Experience Required: Intermediate[/dfd_icon_list_item][dfd_icon_list_item icon=”dfd-icon-heavy_snow”]Acclimatisation: Poor to Average[/dfd_icon_list_item][dfd_icon_list_item icon=”dfd-icon-flag”]Summit Success: Average[/dfd_icon_list_item][/dfd_icon_list][/vc_column][/vc_row][vc_row][vc_column width=”1/6″][/vc_column][vc_column width=”2/3″][dfd_spacer screen_wide_resolution=”1280″ screen_wide_spacer_size=”15″ screen_normal_resolution=”1024″ screen_tablet_resolution=”800″ screen_mobile_resolution=”480″ screen_normal_spacer_size=”10″ screen_tablet_spacer_size=”5″ screen_mobile_spacer_size=”5″][dfd_spacer screen_wide_resolution=”1280″ screen_wide_spacer_size=”15″ screen_normal_resolution=”1024″ screen_tablet_resolution=”800″ screen_mobile_resolution=”480″ screen_normal_spacer_size=”10″ screen_tablet_spacer_size=”5″ screen_mobile_spacer_size=”5″][dfd_spacer screen_wide_resolution=”1280″ screen_wide_spacer_size=”15″ screen_normal_resolution=”1024″ screen_tablet_resolution=”800″ screen_mobile_resolution=”480″ screen_normal_spacer_size=”10″ screen_tablet_spacer_size=”5″ screen_mobile_spacer_size=”5″][dfd_heading style=”style_01″ subtitle=”Make an enquiry with us Now” title_font_options=”tag:h5″ subtitle_font_options=”tag:h3″]Contact us[/dfd_heading][dfd_spacer screen_wide_resolution=”1280″ screen_wide_spacer_size=”15″ screen_normal_resolution=”1024″ screen_tablet_resolution=”800″ screen_mobile_resolution=”480″ screen_normal_spacer_size=”10″ screen_tablet_spacer_size=”5″ screen_mobile_spacer_size=”5″][dfd_user_form fake_check_layout=”forms_05″ placeholder=”off” borderwidth=”1″ border_radius=”2″ text_area_height=”10″ vert_margin_btw_inputs=”15″ horiz_margin_btw_inputs=”10″ font_size=”13″ button_border_width=”1″ button_border_radius=”2″ btn_width=”dfd-third-size” email_to=”info@trekkinghq.com” email_subject=”Shira Route Enquiry ” check_layout=”forms_05.php” input_background=”#f5f5f5″ show_label_text=”on” border_color=”#e8e8e8″ text_color=”#565656″ button_border_color=”#bc9b72″ button_border_color_on_hover=”#9f8465″ button_backgrond=”#bc9b72″ hover_button_backgrond=”#9f8465″ button_color_text=”#ffffff” button_hover_color_text=”#ffffff” check_layout_forms_05=”{“1“:{“text_name“:{“name“:“Name“,“required-1“:“1“}},“2“:{“email“:{“required-1“:“1“,“name“:“Email“,“akismet_comment_author_email-1“:“1“}},“3“:{“text_name“:{“required-1“:“1“,“name“:“Subject“}},“4“:{“textarea_name“:{“name“:“Message“}}}”]
From: {{text_name-1}}
Email: {{email-2}}
Subject: {{text_name-3}}
Message Body:
——–
{{textarea_name-4}}
This e-mail was sent from Shira Route Route Contact Form
[/dfd_user_form][dfd_spacer screen_wide_resolution=”1280″ screen_wide_spacer_size=”15″ screen_normal_resolution=”1024″ screen_tablet_resolution=”800″ screen_mobile_resolution=”480″ screen_normal_spacer_size=”10″ screen_tablet_spacer_size=”5″ screen_mobile_spacer_size=”5″][/vc_column][vc_column width=”1/6″][/vc_column][/vc_row]